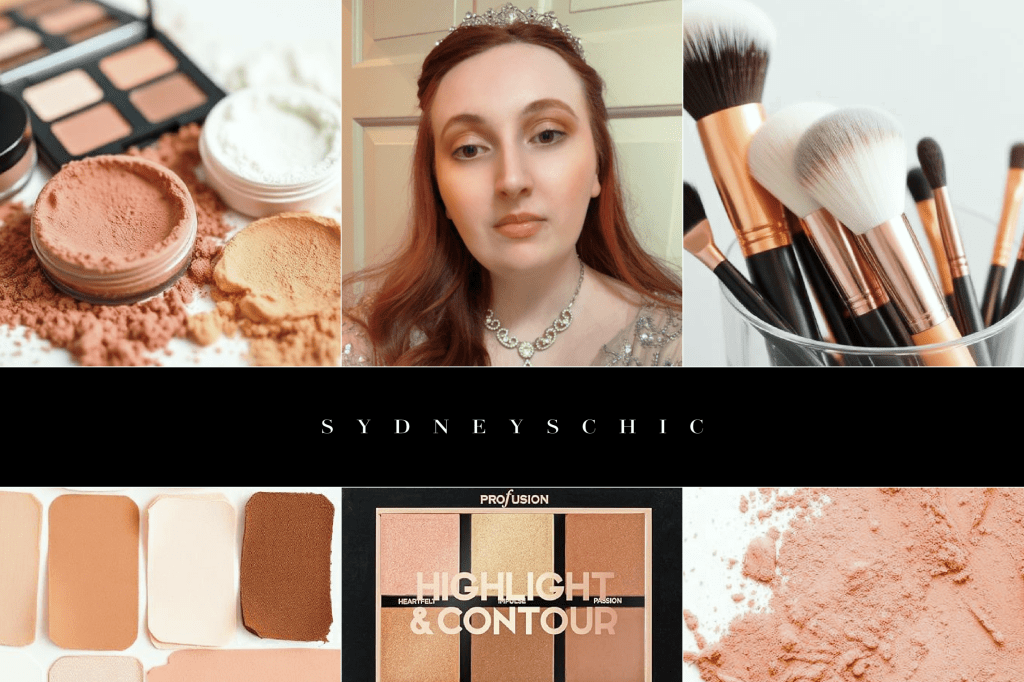

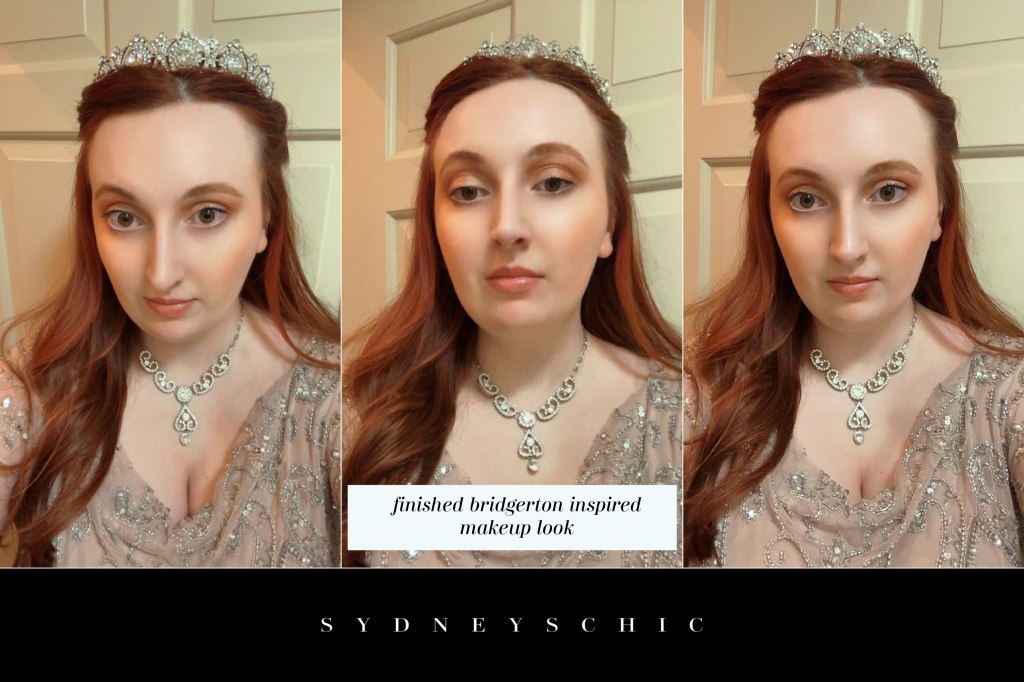
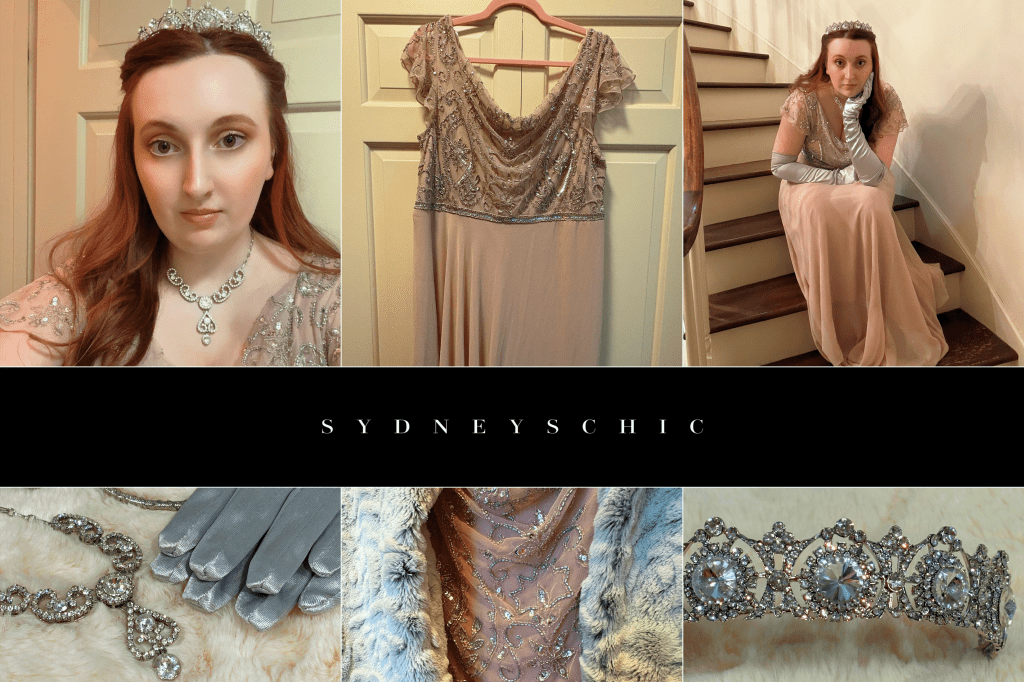
To wrap up our Regency mini series, I wanted to dedicate a final post to the makeup look I wore to the Bridgerton Ball. I considered including it alongside the rest of my costume in last week’s post, but it didn’t feel right to squeeze it in. This look has so many soft details and little techniques that really deserve their own moment—especially for anyone who’s here just for the makeup.
There’s something about Regency inspired beauty that feels so timeless and romantic—glowy skin, delicate color, and that effortless, almost ethereal finish. This has been seen throughout the recent decades on the runway and beyond from designers all across the globe. I wanted to break everything down step-by-step so you can easily recreate the look, whether you’re dressing up for an event or you just wake up feeling like you want to catch a Duke that day—who knows?
So if you’ve been waiting for a full tutorial, this is it—the final piece of the series, and probably the easiest part. I will be linking or sharing the exact products that I use below but as usual, feel free to use your own products that work best! This is a super easy look and there’s really no need to go wild.
Regency makeup
It might come as a surprise—especially if you’re familiar with how strongly “natural beauty” was emphasized during the Regency era—that makeup was still very much a part of women’s routines. It just looked a little different than what we might expect. Rather than bold, obvious cosmetics, the goal was to enhance the complexion so subtly that it appeared effortless, as if no products had been used at all.
The beauty standard of the time leaned heavily into softness and refinement. Pale, luminous skin was considered the height of elegance, often paired with a delicate flush in the cheeks and a barely-there tint on the lips. Everything was meant to look fresh, youthful, and natural—almost ethereal. Features weren’t sculpted or dramatically defined; instead, the focus was on creating a gentle harmony across the face. It was less about transformation and more about quiet enhancement.
That doesn’t mean women weren’t using products—they absolutely were. Light powders were used to mattify and smooth the skin, subtle rouges added a hint of color to the cheeks, and lip tints or balms gave just enough life to the lips. Even the eyes, though minimally defined, might be softly enhanced with natural shading or a slight darkening at the lash line. The key was restraint—everything was applied with a careful hand to maintain that “I woke up like this” illusion.
This approach marked a clear shift from earlier periods like the Rococo and Tudor eras, where makeup was far more dramatic and visibly artificial. In those times, heavy face powders, stark whitening, and bold pigments were used to create high contrast and make a statement. The Regency era moved away from that theatrical style and toward something more understated and romantic—trading intensity for subtlety, and boldness for softness.
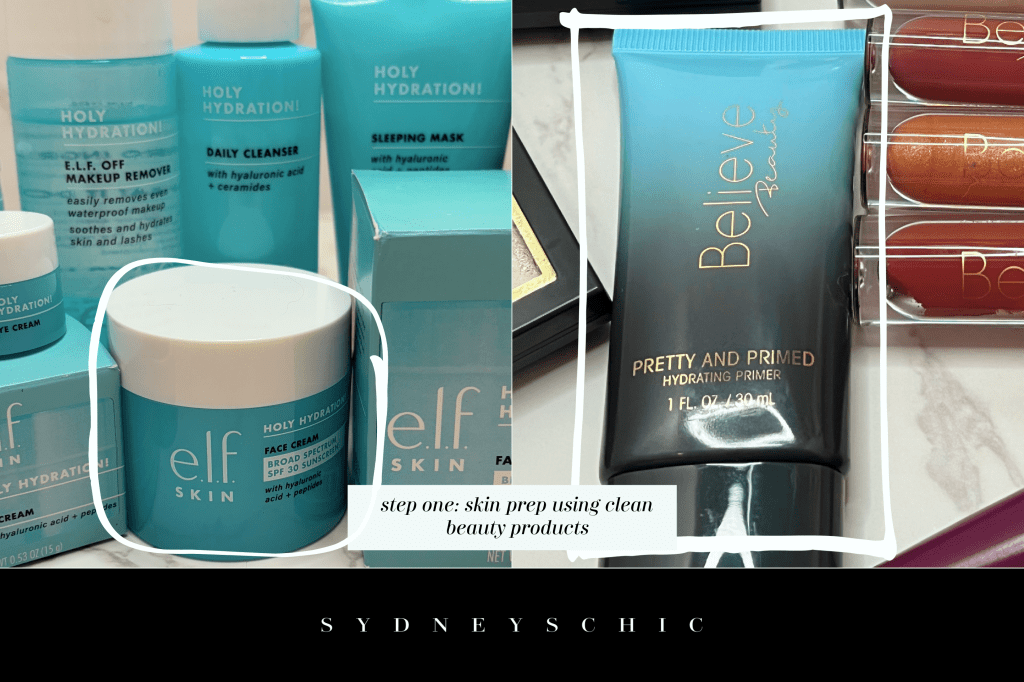
Step One: Skin Prep
Instead of doing a full cleanse every single day which can actually cause more dryness for me, I like to keep things gentle by using micellar water on a cotton pad. It’s my go to for removing dirt and refreshing my skin without stripping it. Micellar water is amazing because it cleans and hydrates at the same time—so your skin isn’t just clean, it feels soft, bouncy, and plumped.
The one I reach for is a rose infused formula from the drugstore, Garnier SkinActive Micellar Water with Rose Water. It’s packed with soothing ingredients (rose is especially great for calming inflammation if your face is puffy or prone to redness), and it’s free from parabens, gentle on sensitive skin, and just overall a really easy option. This water is the power house of my daily skincare and my favorite skin secret!
After I’ve swept that over my face, I let it sink in for a bit. During that time, I’ll usually sip on some water or juice to hydrate from the inside out—or I’ll start doing my hair. I love using this window to multitask because it gives my skin time to fully absorb everything without the risk of spoiling the finished canvas. If you rush this step, you can end up with pilling or leftover product, which makes your makeup sit unevenly.
Once my skin feels fresh and hydrated, I go in with a rich combination of Holy Hydration Face Cream and Eye Cream from E.l.f, to lock everything in. This step is key for smoothing the skin and helping makeup apply more seamlessly (and yes—anything that helps soften fine lines is always welcome). If my skin is feeling extra dry, I’ll swap in a heavier, more nourishing cream to really boost that moisture such as the Holy Hydration Sleeping Mask from the same line. No, it’s not just for beauty sleep! I wear this all day and find it’s actually really nice to wear beneath a full face of makeup.
Then, I give everything another minute to absorb while I gather my makeup brushes and palettes. It’s kind of my reset moment before diving into makeup. In my mind, I make any last minute adjustments to the vision I have in my head.
To finish off my prep, I apply a hydrating primer. This step helps create a smooth base and keeps everything looking fresh longer. The product that I have been using is the clean Pretty and Primed Hydrating Primer from Believe Beauty but I don’t think it’s currently available. I suggest this affordable alternative from E.l.f or something comparable. If you can’t find the exact one I use, any lightweight, hydrating primer will do the trick—especially something affordable and skin-friendly.
And that’s it—skin prepped, hydrated, and ready for makeup.
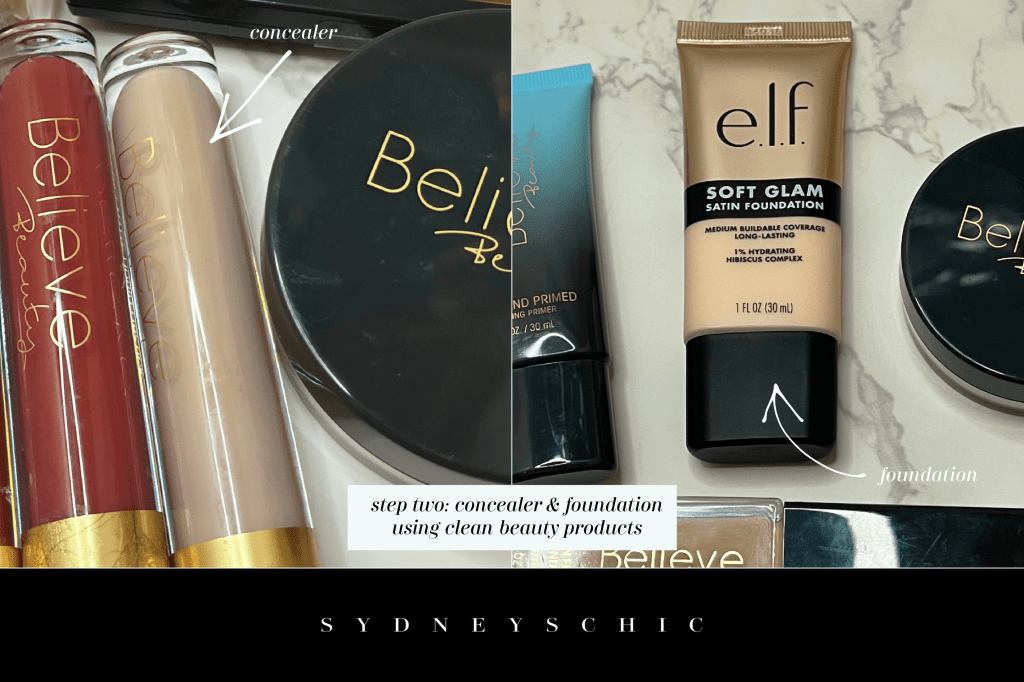
Step Two: Concealer & Foundation
I always start my base by applying concealer under my eyes and on any spots or discoloration. Then I blend everything out with a damp beauty sponge—it gives the smoothest, most natural finish. The concealer I’ve been using is a clean formula, You’re Covered Concealer by Believe Beauty in the lightest shade, ivory. Again, I don’t know that it’s still available so I’ve also been using the E.l.f Hydrating Camo Concealer in the shade, Fair Rose. If you can’t get your hands on either, any lightweight, buildable concealer you love will work just as well.
Once that’s blended, I go in with foundation, Soft Glam Foundation by E.l.f in the shade, 10 fair cool. I like a soft, natural finish, so I use a light layer and blend it right over the concealer using the same sponge. Using one sponge for your entire base (concealer, foundation, even highlight) really helps everything melt together so there aren’t any harsh lines or patches.
After foundation, I’ll go back in with a little more concealer—mainly under my eyes and anywhere that needs extra coverage. I prefer building coverage this way instead of piling on a heavy foundation. It keeps the skin looking more like skin, which is always the goal.
While I’m blending everything out, I like to add a subtle glow by mixing in a bit of liquid highlighter, Revlon Colorstay Endless Glow Liquid Highlighter in the shade, Opal. I either tap it onto the high points of my face or lightly blend it into my foundation for that dewy finish. The key here is to go easy—just a touch makes your skin look fresh and radiant without going overboard.
I also love using a highlight for details like the inner corners of my eyes and my cupid’s bow—it adds just the right amount of brightness in those tiny areas. Always try to focus on the places light hits your face naturally. If you want to read more specifically about how I personally highlight my face, you can find the original post I explained it here.
As always, start with a little and build if you need to. We’re going for a healthy glow—not full on disco ball energy. The goal is for your skin to look like a freshly painted portrait in soft afternoon sunlight. While many tend to shy away from a “dewier” look, this adds to the natural feel of regency makeup as well as the aesthetics of the era.
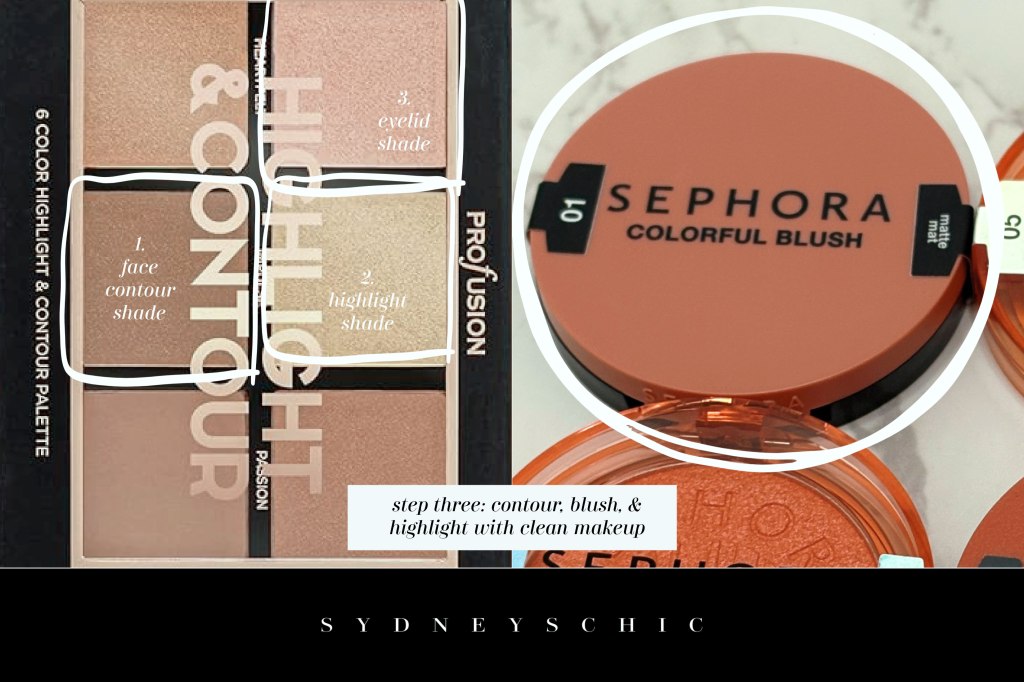
Step Three: Contour, Blush, & Highlight
Before getting into this step, a quick note—because I’m very fair-skinned, I have to use an especially light hand with contour and blush. It’s very easy for things to look too heavy, too fast. If your skin tone is deeper or you’re more comfortable with stronger definition, feel free to adjust this to your usual routine. I’ll still walk through my process in case you’re new to it or just want a softer approach.
For contour, I used a powder palette, Studio Icon Collection & Highlight palette from Profusion Cosmetics , and chose one of the second darkest contour shade so it wouldn’t appear too harsh. If you have fair skin or are specifically seeking a finished look with a lot of natural light rather than shadow, I suggest using the powders in this palette that have some dimension and not the obvious solid choice. You can see what I mean about the difference in the picture. I don’t usually use the solid dark shade unless I’m really going for drama.
Using a large angled brush, I lightly swept the product just under my cheekbones, pulling it upward toward my temples to create a soft, lifted effect. The placement is key here—it should mimic a natural shadow rather than sit too low or look overly sculpted. After applying, I always go back in with the same sponge I used for my base and gently blend over the edges. This helps diffuse the contour and melt it into the foundation so it looks like a natural dimension rather than a stripe.
Blush is where I keep things especially soft for this look which is meant to be romantic. I used a warm-toned rose shade, Sephora Colorful Blush in shade 01 Matte is named Shame On You, and applied it lightly to the center of my cheeks, blending upward along the cheekbone to keep everything lifted and cohesive. It’s important to apply the blush lightly at first and slowly layer it on until you’ve gotten the perfect whisp of pink you’re looking for. Again, this meant to look natural.
Since I already added a subtle glow earlier with liquid highlighter, this step is more about refining and enhancing that luminosity. After setting everything with powders, I like to go in with a powder highlighter to bring the glow back to the surface. Using the same profusion palette from above, I chose the lightest shimmery shade.
The lightest shade goes on the inner corners of my eyes and just under the brow bone to catch the light and brighten those areas. A slightly deeper shimmer is swept over the tops of my cheeks, blending into the blush and sitting right above the contour for that seamless glow. If needed, I’ll use a deeper tone very sparingly—either to soften an overly strong contour or to add a bit more dimension in areas that need it.
Now I also did something that I usually wouldn’t do. Once I finished my eyeshadow, I went back and brushed the lightest brown highlight shade over my eye lid on top of my shadow to further blend everything together and lighten. I will explain it below better, just keep in mind that once your eyeshadow is done, you’ll be going back to the highlighter after. As always, the goal here is a soft, diffused finish. Nothing too sharp, nothing too heavy—just enough to add shape and dimension.
Step Four: Eyebrows
My brows are actually one of the quickest parts of my routine, mostly because I tint them. It saves so much time and effort on a daily basis, and the results last longer than filling them in every single time I do my makeup. I’m just not someone who wants to spend half my routine perfecting brows unless it’s a special occasion—most days, it’s truly a tint and go situation.
I usually get my brows tinted at the salon, but in between appointments I maintain them at home with a temporary tint, Color Gloss Up Temporary Hair Dye from Clariol in the shade, Terra Copper. It keeps the color fresh and helps everything look a little more polished without much work. As a bonus, tinting can also help soften the look of bristly brows and keep them appearing more smooth and groomed overall.
For everyday looks, I prefer my brows to stay natural—nothing too heavy, harsh, or overly defined. I’m not a fan of that super powdery or drawn-on look. That said, for this particular look (and anytime I’m getting a bit more dressed up), I do like to add a little extra definition.
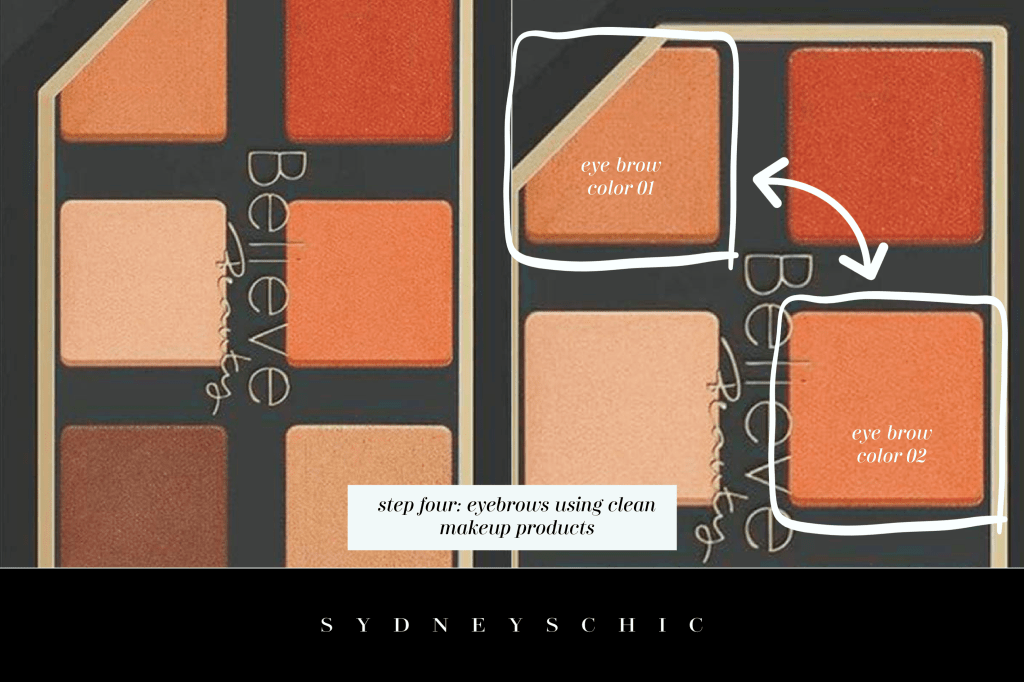
Instead of using a traditional brow product, I actually reach for eyeshadow—specifically warm, coppery tones. When you have vibrant or unique hair color, it can be surprisingly hard to find a brow product that matches well so I use Sultry Sunset Eyeshadow Palette by Believe Beauty. Using eyeshadow or even blush gives you more flexibility to customize the shade, and when it’s blended properly, it looks incredibly natural. It might sound unconventional, but it works.
To pull everything together, I’ll sometimes go in with a brow pencil, LA Colors Wowie Browie Precision Smudge Proof Eyebrow Pencil in the shade, light/medium to lightly define and blend, especially in sparse areas. It’s an older staple in my routine, but paired with the softer powder, it helps create a balanced, dimensional brow. Overall, the goal is simple: soft, natural, and effortless—with just enough definition to frame the face without stealing the spotlight.
Step Five: Eyeshadow
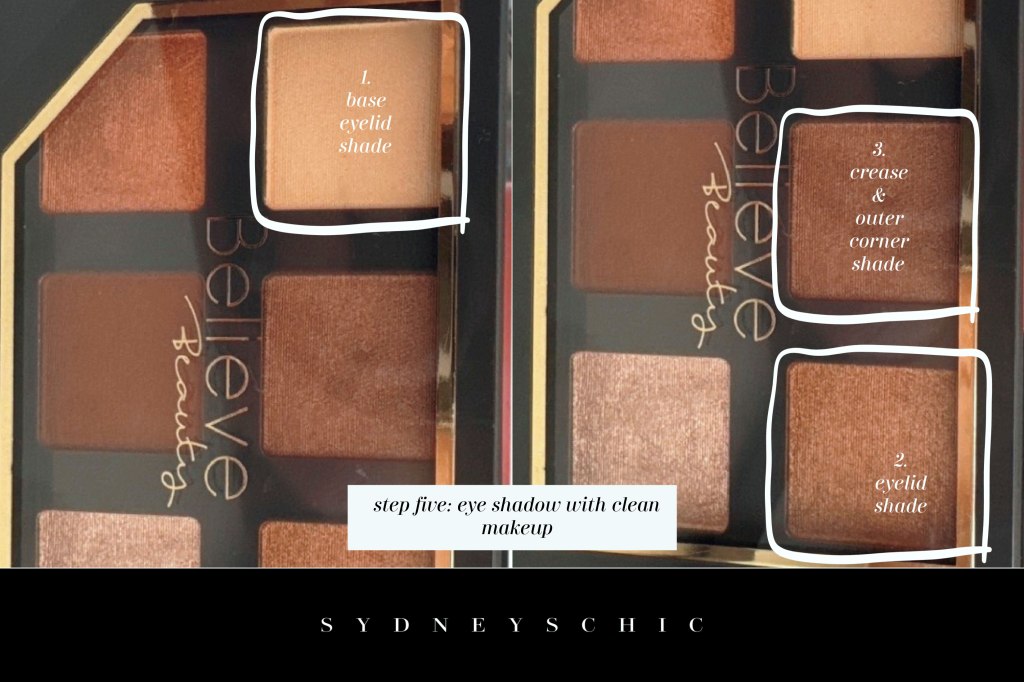
The eye shadow palette that I used is the clean Nearly Nude Eyeshadow Palette from Believe Beauty. Given that many Believe Beauty products are getting harder to find, any palette that you already have that’s similar will definitely do! Just make sure that whatever palette you end up using, it’s pigmented and blendable.
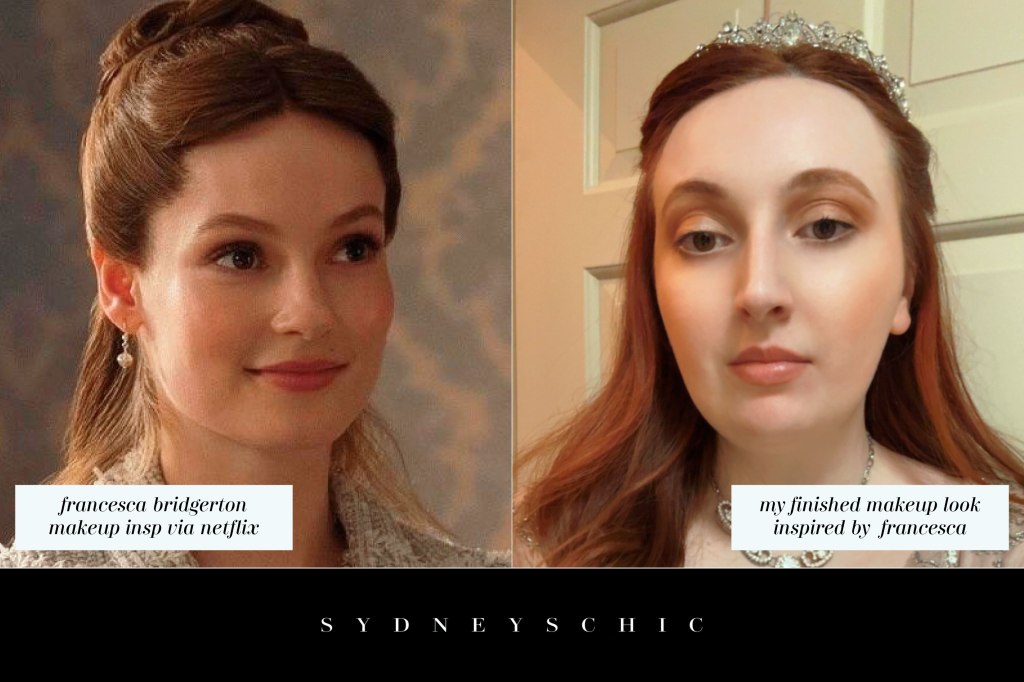
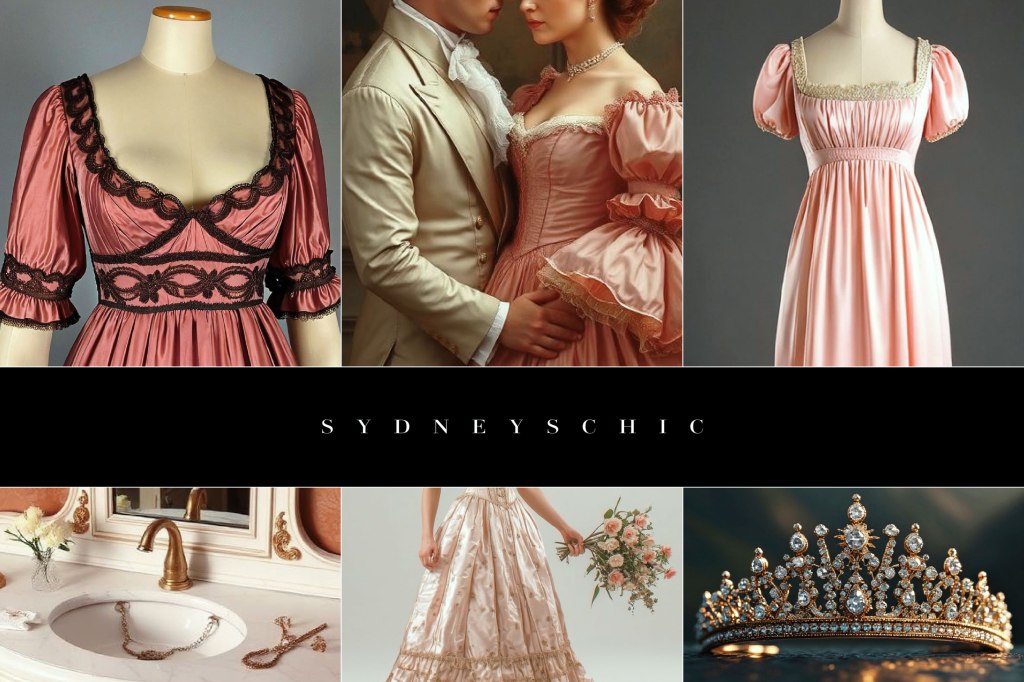
Using the top picture of Francesca Bridgerton as the inspiration, I wanted to focus on earthy browns and neutrals. I decided to use the lightest color in the palette that basically “skin color” as a base across my whole eye lid. Using a base shade not only evens out the color under the rest of your shadows but will help with blending later. Layer this on generously until your whole eyelid looks well covered.
The next shade that I used is the second lightest brown with a slight shimmer. I applied this to the middle of my lid and blended outwards and upwards towards the outer corner and crease of my eye. I built up the color until it was pigmented on my lid leaving the inner corner alone for highlighting later.
The last eyeshadow shade that I used is the darkest brown with pressed shimmer in the powder. I applied this to the whole crease of my eye and blended it into the farthest part of the outer corner. I blended this shade into the light brown and base with a fluffy brush to soften the edges. When I had blended everything well, I went back to the farthest part of the outer corner and darkened up any pigmentation that had become to blended. It’s important that the outer corner of the eye keeps the darkness for dimension.
Whenever I’m doing my eye shadow, I use the same simple formula: lightest to medium to dark from inner corner to outer corner. This not only makes blending easier but it also creates that faded gradient affect that often looks most natural for the eyes. While it’s crucial to blend, what’s most important is making sure that edges are soft and the distinctive colors are still visible and not merged into one from a heavy hand.
Once I had finished my eye shadow, I went back with the lightest brown shimmer shade from the Studio Icon Collection & Highlight palette from Profusion Cosmetics . I worked the highlight from the very inner corner of my eye near my tear duct, carefully pressing it lightly on top of the two brown shadows so as not to disturb the color below but lighten. I applied the most generous amount of high lighter to my inner corner at my tear duct, using the same “outward fade” technique. This left my shade variations and pigmentation in place while adding a finishing polish.
Step Six: Mascara & Eyeliner
As I’ve mentioned before, I always start this step with a white eyeliner in my waterline, L’Oreal Paris Infallible Grip Mechanical Gel Smudge Resistant Waterproof Eyeliner Pencil in Polar White. It’s one of my favorite little tricks—it instantly brightens the eyes, cancels out any redness, and makes you look more awake and refreshed. It’s such a small detail, but it makes a huge difference in the overall look. The one I’ve been using is an older favorite from before I switched to cleaner beauty products, and while I haven’t found a perfect replacement yet, I keep coming back to it because it just works. The shade is a true, bright white, which is key for getting that wide-eyed effect.
Once my waterline is set, I go in with a softer, darker liner, Perfect Blend Eyeliner by Covergirl in the shade black/brown, along the lower lash line—just beneath the white. I prefer a black brown shade rather than a harsh black because it creates a more natural shadow. Using the built-in smudger (or even a small brush), I gently blend the line out so it looks diffused rather than sharp. This step subtly defines the eyes and gives the illusion of fuller, longer lashes without looking heavy or overdone.
If I’m being honest, eyeliner is probably the one step I’m the most particular about. Even on days when I’m wearing little to no makeup, I’ll almost always have some form of liner on—it just pulls everything together and makes me feel more polished. This is particularly important if you’re fair skinned because no one likes that “freshly dug up corpse” look unless it’s Halloween, am I right?
I personally skip eyeliner on my upper lash line. I find that a thick line across the top can make my eyes look smaller or more closed off, especially for this softer, more romantic style. Instead, I focus on enhancing the natural shape of my eyes. The white liner helps open them up and create the illusion that they’re larger and more rounded, rather than elongating them with something like a wing. Of course, it all comes down to personal preference, but this technique works beautifully for my features.
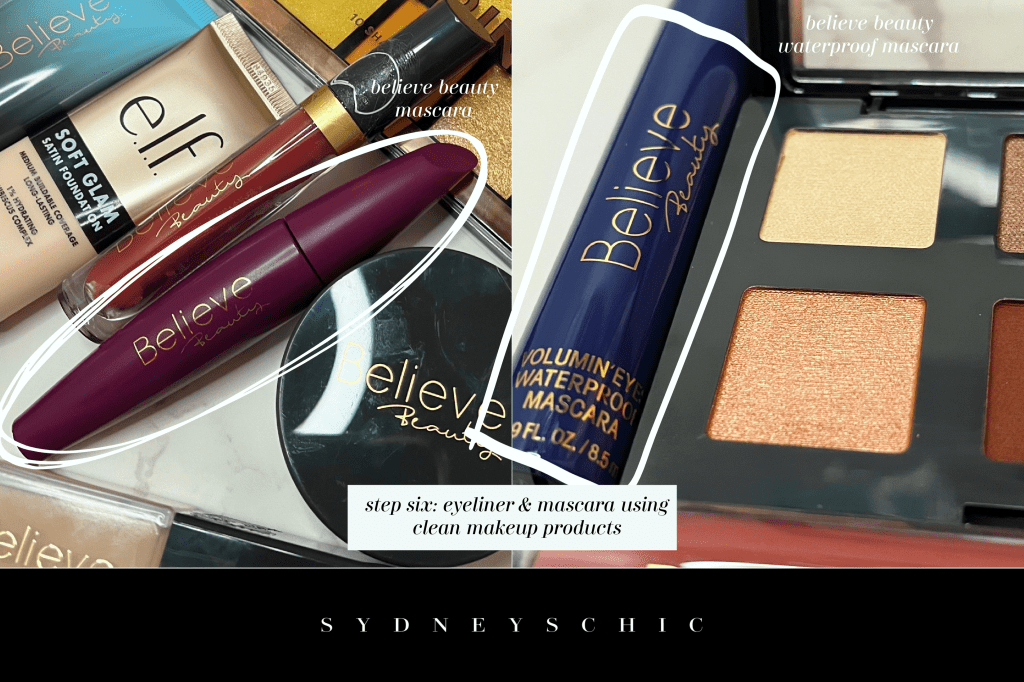
For mascara, I start with a clean, volumizing formula, High Volume Mascara by Believe Beauty, and apply a light first coat, gently wiggling the wand through my lashes to keep them separated. Clumping is the enemy here—I want soft, fluttery lashes, not heavy ones. If I notice any sticking together, I’ll carefully separate them using the tip of the wand. (Fun fact: Audrey Hepburn was known to separate her lashes individually with a needle for that perfectly defined look—iconic behavior, honestly.)
Since the forecast was calling for snow when I was putting on this look this look, I layered a waterproof mascara, Volumin Eyes Waterproof Mascara by Believe Beauty, over top to lock everything in place. This helps hold the curl and keeps the lashes from smudging or falling throughout the day. After that, I do one last check to make sure everything is still nicely separated and defined. The end result is soft, lifted, and looking lashes paired with bright, open eyes—nothing too heavy, just effortlessly enhanced.
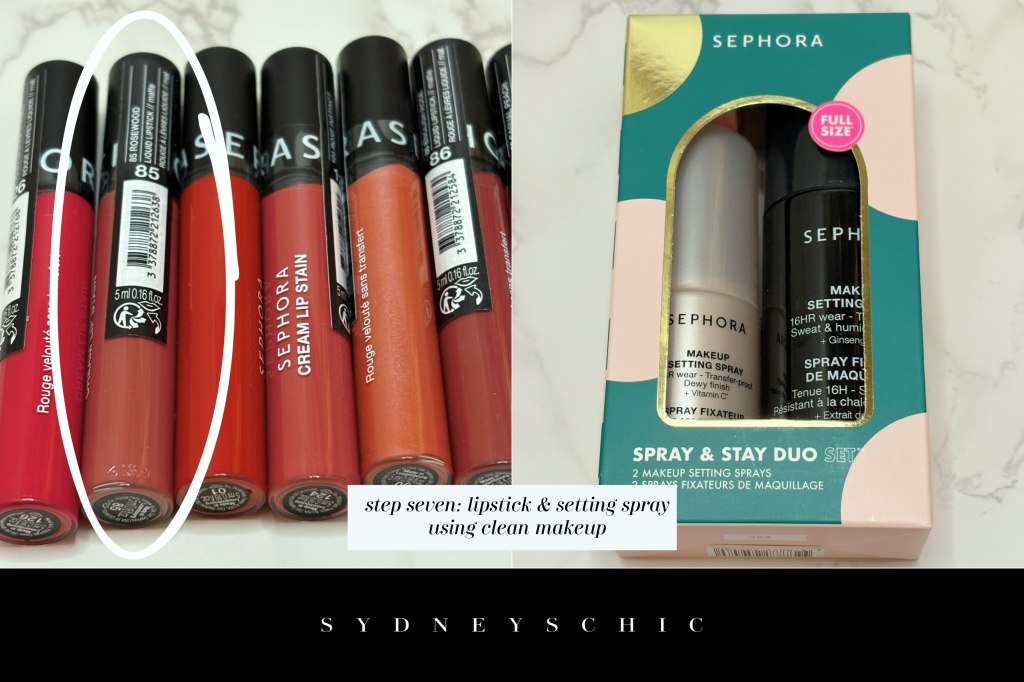
Step Seven: Lips & Setting Spray
I always start my lips with a liner that’s close to my natural lip color—it just helps shape everything and gives a nice base to build on. I wish I could tell you exactly which one I use, but the label has completely worn off at this point. It came in a kit ages ago, and now it’s one of those “use it until it’s gone and then reassess your life choices” kind of products. You know the type. Honestly any lip liner that fits the color palette will do.
Once my lips are lined, I went with a Sephora Collection Cream Lip Stain Liquid Lipstick. There are many “rose” colors in this collection and any of them would work fine depending on your skin tone but I’m pretty sure the exact shade I used was either 41 Vintage Rosewood or 85 Rosewood. For a look like this—especially for an event—I really rely on stains because they last so much longer and don’t require constant touch ups. The trade off, of course, is that most of them can be a bit drying. Luckily this cream liquid lip stain that I found from Sephora seems to be a happy medium! You’ll likely still need a gloss at some point but it’s definitely not as drying of a product as others I’ve used so I recommend it!
To bring some life back into the lips, I always layer a clear gloss, Nicka K New York Lip Gel, over top. While it’s not a considered a completely clean formula, it is cruelty free, vegan, and lacks many of the harmful chemicals other cosmetics use. I just haven’t found a comparable clean product that I like better but I’m still looking! This step completely transforms the look—adding shine, dimension, and that soft, romantic finish that ties everything together. The gloss I use is easily one of my all time favorites. It’s smooth and gives the most beautiful luminous sheen while not rubbing off easily. What I like about it is that it really locks in the lip color under the gel.
Once everything is in place, I lock it all in with a setting spray from the Sephora Collection Stay & Spray Duo Set. This is one of those final steps that makes a huge difference—it melts all the powders together, takes away any dryness, and keeps everything looking fresh for hours. The one I use gives such a pretty, hydrated finish and smells amazing, which is always a bonus. And with that, the look is complete—soft, glowing, and ready to last all night.
Final Thoughts
And just like that, the look is complete—soft, romantic, and perfectly suited for a night that feels straight out of Bridgerton. This entire routine is really about enhancing what’s already there: glowing skin, delicate color, and features that feel effortless rather than overdone. Nothing too heavy, nothing too precise—just that dreamy, lit-from-within kind of beauty.
What I love most about this style is how wearable it is. You don’t have to be on your way to a ball to recreate it (although I highly recommend the experience if you ever get the chance). It translates just as beautifully to a date night, a special event, or even those days when you simply want to feel a little more put together.
At the end of the day, Regency-inspired makeup is less about perfection and more about softness—blended edges, natural tones, and that subtle glow that makes everything feel a bit more magical. So whether you followed every step or just took a few ideas to make it your own, I hope this helped you capture a little piece of that elegance.
Now all that’s left is to step out, turn a few heads, and enjoy your very own main character moment. I hope you enjoyed the conclusion of our Bridgerton mini series throughout March. Stay dazzling, diamonds!

make sure you subscribe & follow to be notified of new content
©sydneyschic ┊image credit: sydneyschic ┊unsponsored post


Tell me what you think!